Friday, May 22, 2020

Entropy: Netwave And GoAhead IP Webcams Exploiting Tool


About Entropy Toolkit
   Entropy Toolkit is:
  • A set of tools to exploit Netwave and GoAhead IP Webcams.
  • A powerful toolkit for webcams penetration testing.

Entropy Toolkit's installationEntropy Toolkit's execution

Entropy Toolkit's examples:
  • Example of exploiting a single webcam
    entropy -b 1 -i [webcam's ip address and port] -v
    Example: entropy -b 1 -i 192.168.1.100:80 -v
  • Example of exploiting webcams from a list
    entropy -b 2 -l [file text] -v
    Example: entropy -b 2 -l iplist.txt -v
  • Example of exploiting webcams using shodan
    entropy -b 2 -v --shodan [you shodan api key]
    Example: entropy -b 2 -v --shodan PSKINdQe1GyxGgecYz2191H2JoS9qvgD

Entropy Toolkit disclaimer:
   Usage of the Entropy Toolkit for attacking targets without prior mutual consent is illegal. It is the end user's responsibility to obey all applicable local, state, federal, and international laws. Developers assume no liability and are not responsible for any misuse or damage caused by this program.

Entropy Toolkit license: MIT license.

Download Entropy Toolkit
(Sign up Windscribe for free, get full protection and stay anonymous
with the best free VPN. Read more here)

More information


Networking | Switching And Routing | Tutorial 3 | 2018


Welcome to my 3rd new tutorial of networking (Routing and Switching). In this blog you will able to watch an interesting video about basic device navigation such as changing device (router or switch) name, configuration of login password, configuring a device information, router IP addresses and many more.

What is router?

Router is a network layer device which is the 3rd layer in the OSI model which is used to communicate different networks. It is an intelligent device fixed at the boundary of network that connects to other networks and responsible for end to end delivery of the packet that requires an IP address which is known as the logical address which is the basic identity of the device just like our identity card number or roll number and so on, for the identification of source and destination devices. Router is the gateway of the network having two interfaces such as inbound and the outbound interface through which the traffic comes in from different networks and comes out traffic to the different networks.

What is an IP address?

Internet protocol (IP) address is a numeric label given to each and every device in the network for the identification of the device just like our roll numbers in collages, universities which identity each and every student uniquely everywhere. So same concept here, it is a logical address which is used whenever the device want to communicate outside the network that means to another network.

What is Switch?

Switch is basically layer 2 device, which is used to connect two or more than two devices with each other in the same network. It is an intelligent device which doesn't allow the broadcast. It requires Media access control (MAC) address to communicate within the network. Now let's move to the video for further.

Continue reading


Wednesday, May 20, 2020

Sharingan - Offensive Security Recon Tool


Sharingan is a recon multitool for offensive security / bug bounty
This is very much a work in progress and I'm relatively new to offensive security in general so if you see something that can be improved please open an issue or PR with suggested changes.

Cloning for development
Outside of your gopath git clone https://github.com/leobeosab/sharingan

Installing
go get github.com/leobeosab/sharingan/cmd/sharingancli

Dependencies
  • NMap
  • Go

Usage

Note
Order matters when it comes to flags it must be sharingancli [globalflags] command [commandflags] if this isn't a wanted feature I can change it but I like how clean it is

DNS

bruteforce
DNS busts the target with a wordlist you provide
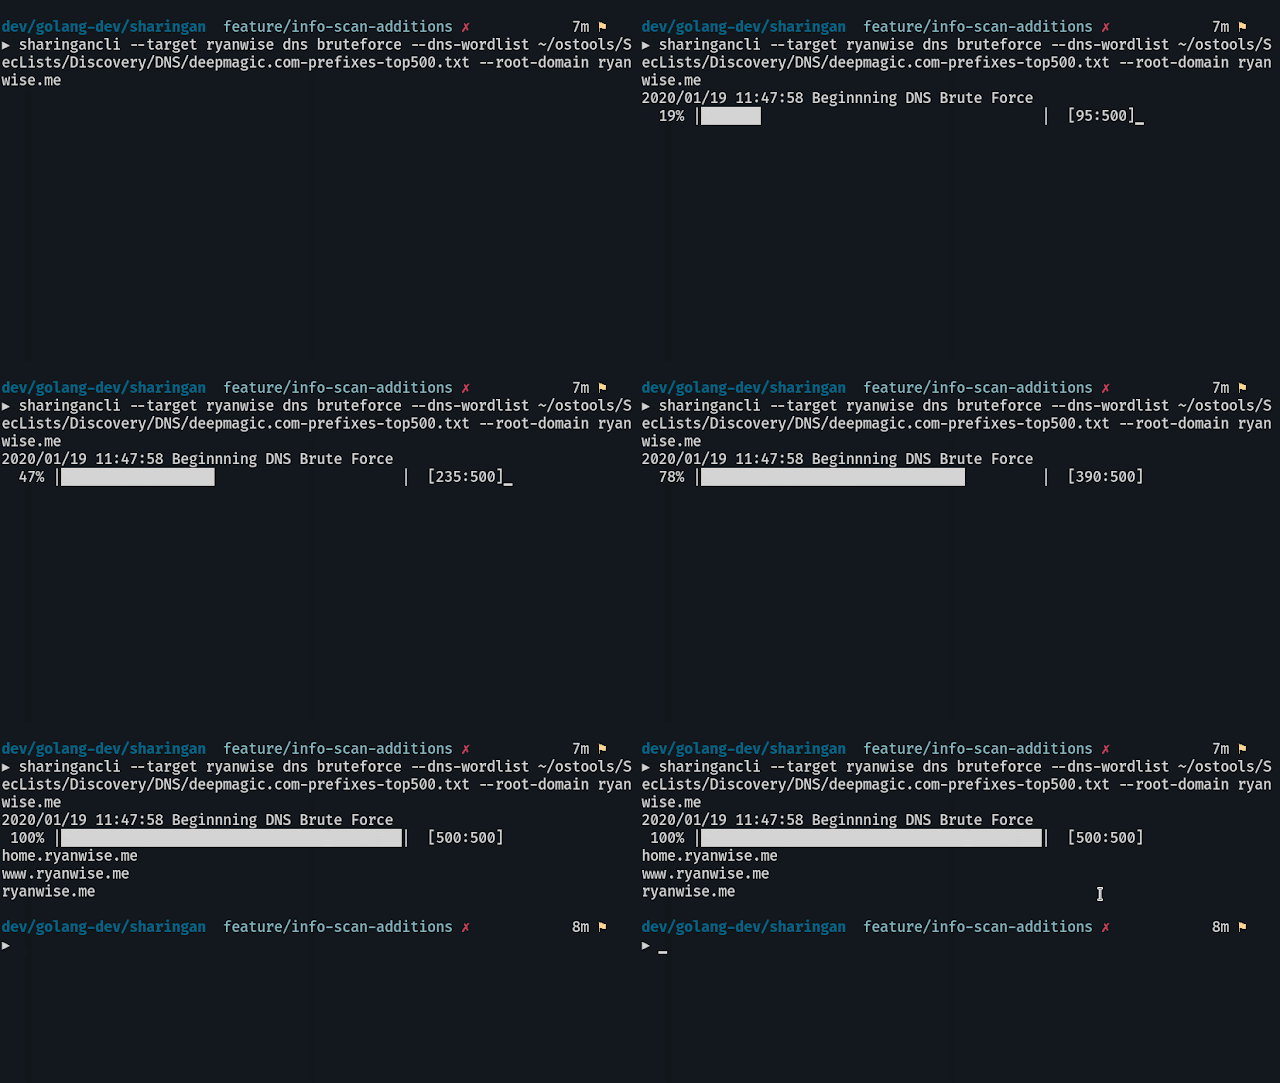
sharingancli --target targetname dns --dns-wordlist ~/path/to/wordlist --root-domain target.com


addsubs
Adds subdomains to the program's storage from stdin using pipes
cat subs | sharingancli --target targetname dns addsubs

Scan
Scans all hosts available that were stored in target using nmap
sharingancli --target target scan


interactive
Scan a single host from list of subdomains stored in target
sharingancli --target target scan interactive


info

domains
Outputs all domains as a list in stdout
sharingancli --target target info domains


Features to come
  • Dir brute forcing -- Currently being worked on
  • JSON and regular file exports
  • Automated scans through a daemon?
  • add a way to do SYN / -sS scanning [ must be root so it presents a challenge ]
  • Possible Web ui / html export


via KitPloit

Related links


wpCrack - Wordpress Hash Cracker


Wordpress Hash Cracker.

Installation
git clone https://github.com/MrSqar-Ye/wpCrack.git


Video


Related word


Voodoo-Kali - Kali Linux Desktop On Windows 10

Iemhacker-kali-windows

How it works?
 * Kali Linux with XFCE Desktop Environment in Windows Subsystem for Linux (WSL)
 * VcXsrv X Server for Windows is doing the hard GUI lifting
 * XFCE is started natively in WSL and displayed by VcXsrv

Install Voodoo-Kali:
 1, Enable WSL and install Kali Linux from the Microsoft Store. Read Install Kali Linux desktop on Windows 10 from Microsoft Store

 2, To start Kali Linux in Windows 10, open Command Prompt and enter the command: kali

 3, Enter this commands:
      apt install wget -y 
      wget https://raw.githubusercontent.com/Re4son/WSL-Kali-X/master/install-WSL-Kali-X
      bash ./install-WSL-Kali-X

 4, Download and install VcXsrv Windows X Server from SourceForge

 5, Start VcXsrv, accept change in firewall rules, exit VcXsrv

Run Voodoo-Kali:
   Start kali in Windows as normal user (that's default), and launch Voodoo-Kali:
    * as normal user: ./start-xfce
    * as root: sudo /root/xtart-xfce

Run Kali Desktop in an RDP session:
   In Kali Linux WSL, type: sudo /etc/init.d/xrdp start
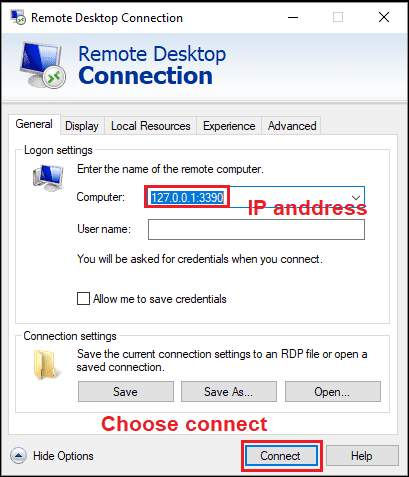
   In Windows 10, open Run and enter mstsc.exe and connect to "127.0.0.1:3390"
remote%2Bdesktop

Status: Voodoo-Kali is in its infancy and it is far from being elegant. I'm working on it though and step by step I'll push out improvements. Below a snippet of the To-Do list:
 * Clean up and comment the scripts
 * Make for a cleaner exit
 * Better error handling and dependency checking (get rid of sleep, etc.)
 * Improve stability of Java programs
 * Improve the looks??
 * …

   Any help is truly appreciated, in any shape or form – from tips to pull requests.
   Why don't you join the forums to discuss?

Further Information:
 * Offsec – Kali Linux in the Windows App Store
 * MSDN – Windows Subsystem for Linux Overview

                                       Download Voodoo-Kali

Related articles


Tuesday, May 19, 2020

Linux Stack Protection By Default

Modern gcc compiler (v9.2.0) protects the stack by default and you will notice it because instead of SIGSEGV on stack overflow you will get a SIGABRT, but it also generates coredumps.


In this case the compiler adds the variable local_10. This variable helds a canary value that is checked at the end of the function.
The memset overflows the four bytes stack variable and modifies the canary value.


The 64bits canary 0x5429851ebaf95800 can't be predicted, but in specific situations is not re-generated and can be bruteforced or in other situations can be leaked from memory for example using a format string vulnerability or an arbitrary read wihout overflowing the stack.

If the canary doesn't match, the libc function __stack_chck_fail is called and terminates the prorgam with a SIGABORT which generates a coredump, in the case of archlinux managed by systemd and are stored on "/var/lib/systemd/coredump/"


❯❯❯ ./test 
*** stack smashing detected ***: terminated
fish: './test' terminated by signal SIGABRT (Abort)

❯❯❯ sudo lz4 -d core.test.1000.c611b7caa58a4fa3bcf403e6eac95bb0.1121.1574354610000000.lz4
[sudo] password for xxxx: 
Decoding file core.test.1000.c611b7caa58a4fa3bcf403e6eac95bb0.1121.1574354610000000 
core.test.1000.c611b : decoded 249856 bytes 

 ❯❯❯ sudo gdb /home/xxxx/test core.test.1000.c611b7caa58a4fa3bcf403e6eac95bb0.1121.1574354610000000 -q 


We specify the binary and the core file as a gdb parameters. We can see only one LWP (light weight process) or linux thread, so in this case is quicker to check. First of all lets see the back trace, because in this case the execution don't terminate in the segfaulted return.


We can see on frame 5 the address were it would had returned to main if it wouldn't aborted.


Happy Idea: we can use this stack canary aborts to detect stack overflows. In Debian with prevous versions it will be exploitable depending on the compilation flags used.
And note that the canary is located as the last variable in the stack so the previous variables can be overwritten without problems.


Related news


  1. Javascript Hacking
  2. Curso Hacker
  3. Hacking Hardware
  4. Marketing Growth Hacking
  5. Curso De Hacking Etico Gratis
  6. Que Es Hacker En Informatica
  7. Hacking Wireless 101 Pdf
  8. Hacking Books
  9. Hacking Online Games
  10. Hacking Web Sql Injection
  11. Servicio Hacker
  12. Hacking Traduccion
  13. Hacker Blanco
  14. Growth Hacking Marketing
  15. Que Estudia Un Hacker

BurpSuite Introduction & Installation


What is BurpSuite?
Burp Suite is a Java based Web Penetration Testing framework. It has become an industry standard suite of tools used by information security professionals. Burp Suite helps you identify vulnerabilities and verify attack vectors that are affecting web applications. Because of its popularity and breadth as well as depth of features, we have created this useful page as a collection of Burp Suite knowledge and information.

In its simplest form, Burp Suite can be classified as an Interception Proxy. While browsing their target application, a penetration tester can configure their internet browser to route traffic through the Burp Suite proxy server. Burp Suite then acts as a (sort of) Man In The Middle by capturing and analyzing each request to and from the target web application so that they can be analyzed.


Everyone has their favorite security tools, but when it comes to mobile and web applications I've always found myself looking BurpSuite . It always seems to have everything I need and for folks just getting started with web application testing it can be a challenge putting all of the pieces together. I'm just going to go through the installation to paint a good picture of how to get it up quickly.

BurpSuite is freely available with everything you need to get started and when you're ready to cut the leash, the professional version has some handy tools that can make the whole process a little bit easier. I'll also go through how to install FoxyProxy which makes it much easier to change your proxy setup, but we'll get into that a little later.

Requirements and assumptions:

Mozilla Firefox 3.1 or Later Knowledge of Firefox Add-ons and installation The Java Runtime Environment installed

Download BurpSuite from http://portswigger.net/burp/download.htmland make a note of where you save it.

on for Firefox from   https://addons.mozilla.org/en-US/firefox/addon/foxyproxy-standard/


If this is your first time running the JAR file, it may take a minute or two to load, so be patient and wait.


Video for setup and installation.


You need to install compatible version of java , So that you can run BurpSuite.

More info


  1. Hacking Prank
  2. Hacking Madrid
  3. Hacking 101
  4. Mind Hacking
  5. Hackers Informaticos Contactar
  6. Curso De Ciberseguridad Y Hacking Ético
  7. Programa Hacker
  8. Que Es El Hacking Etico
  9. Hacking Websites
  10. Libro De Hacking
  11. Tools Hacking
  12. Hacking To The Gate
  13. Programa De Hacking
  14. Hacking Videos
  15. Curso Completo De Hacking Ético
  16. Black Hacker

Monday, May 18, 2020

How To Start | How To Become An Ethical Hacker

Are you tired of reading endless news stories about ethical hacking and not really knowing what that means? Let's change that!
This Post is for the people that:

  • Have No Experience With Cybersecurity (Ethical Hacking)
  • Have Limited Experience.
  • Those That Just Can't Get A Break


OK, let's dive into the post and suggest some ways that you can get ahead in Cybersecurity.
I receive many messages on how to become a hacker. "I'm a beginner in hacking, how should I start?" or "I want to be able to hack my friend's Facebook account" are some of the more frequent queries. Hacking is a skill. And you must remember that if you want to learn hacking solely for the fun of hacking into your friend's Facebook account or email, things will not work out for you. You should decide to learn hacking because of your fascination for technology and your desire to be an expert in computer systems. Its time to change the color of your hat 😀

 I've had my good share of Hats. Black, white or sometimes a blackish shade of grey. The darker it gets, the more fun you have.

If you have no experience don't worry. We ALL had to start somewhere, and we ALL needed help to get where we are today. No one is an island and no one is born with all the necessary skills. Period.OK, so you have zero experience and limited skills…my advice in this instance is that you teach yourself some absolute fundamentals.
Let's get this party started.
  •  What is hacking?
Hacking is identifying weakness and vulnerabilities of some system and gaining access with it.
Hacker gets unauthorized access by targeting system while ethical hacker have an official permission in a lawful and legitimate manner to assess the security posture of a target system(s)

 There's some types of hackers, a bit of "terminology".
White hat — ethical hacker.
Black hat — classical hacker, get unauthorized access.
Grey hat — person who gets unauthorized access but reveals the weaknesses to the company.
Script kiddie — person with no technical skills just used pre-made tools.
Hacktivist — person who hacks for some idea and leaves some messages. For example strike against copyright.
  •  Skills required to become ethical hacker.
  1. Curosity anf exploration
  2. Operating System
  3. Fundamentals of Networking
*Note this sites


Related articles
  1. Ingeniería Social. El Arte Del Hacking Personal Pdf
  2. Codigo Hacker
  3. Mind Hacking
  4. Hacking Windows: Ataques A Sistemas Y Redes Microsoft
  5. Hacking Smart Tv
  6. Drupal Hacking
  7. Hacking In Spanish
  8. Herramientas De Seguridad Informatica
  9. Hacking Growth Pdf
  10. Google Hacking Database
  11. Ethical Hacking
  12. Hackers Informaticos Contactar
  13. Hacking For Dummies
  14. Hacking Articles
  15. Pagina Hacker

Evil Limiter: Taking Control Of Your Network Bandwidth


Ever wanted to block someone from the network or limit their bandwidth without having the network admin privileges? Well Evil Limiter has got you covered then.


An amazing tool to help you control your network without having access to the admin panel.

Today I'm gonna show you how to use this interesting tool to take control of your network.


Requirements:

1. A PC or Laptop with Linux OS.
2. A Network Adapter.
3. Access to the Network you want to control.
4. sudo or root access on your Linux OS.

First of all we will download the tool from its github repository:

https://github.com/bitbrute/evillimiter

You can download and extract the zip file from the link above or you can clone evillimiter repository using git like this:


git clone https://github.com/bitbrute/evillimiter 


Now lets install the downloaded tool on our machine

Step 1: Move inside the downloaded github repository

cd evillimiter


Step 2: To install type


sudo python3 setup.py install


wait for the installation to finish (May take some time)


Step 3: To run type


sudo evilimiter


Voila! That's it, you got it up and running on your machine


Now how do you control your network with it, its very easy.

It should detect your network automatically but yeah you can set it up manually as well using the command line argument -i.

After you have selected the right interface to control, you need to scan your network for live hosts. To perform the scan type


scan


you can pass an optional flag to the scan command which is range which will help you to specify the range of ip addresses you want to scan like this


scan --range 192.168.1.1-192.168.1.100


The above command will scan a total of 100 hosts from 192.168.1.1 to 192.168.1.100


Now after you have scanned your network next thing is to list the hosts that have been discovered during the scan for that you type the hosts command like this


hosts


Now you know the hosts on your network and now you should know which host you wanna block or limit based on the mac address of the host. Remember the host id of the host that you want to block or limit bandwidth of and lets do the magic.

to block a host from using the internet we simply specify the block command followed by the host id of the host that we want to block like this

block 1


if instead of blocking the host we just want to limit his internet bandwidth we can do just that by using the limit command followed by the host id and then the bandwidth that we want to allocate to that particular host like this


limit 1 100kbits


Wohooo! yeah its that easy and yes you can do all this without having the network admin role.

Now if you want to show mercy on that poor guy (blocked host), you can set him free by using the free command followed by the host id like this:

free 1


Well isn't administrating your network bandwidth so easy now.

Hope you enjoyed this tutorial.:)

More articles